Thursday, 28 June 2012

Roasted Vege Sandwich


In an effort to add healthier meals to our diet, I decided to add in a vegetarian meal once a week.  I really liked this sandwich and all of the yummy summer veges on top of a delicious piece of Tuscan Garlic Bread from the Publix Bakery.

Don, on the other hand, was not too thrilled with my idea of adding in more healthful meals. He kept asking "where's the beef?" Not that he doesn't want to eat healthy - he just didn't like this sandwich.  He LOVED the veges - we both agree the roasted veges are delicious and we should include them more often.  He did not like the garlicky spread and the Feta cheese on this sandwich. The once a week vege meals might be too much for him - I will have to ease into that a little slower and maybe do once every other week for now...

What does he know - the garlic was yummy and the feta added a nice touch.  I told him there was leftover pizza in the fridge he could eat if he preferred, but he suffered through and gobbled up all of his sandwich.  Usually he'll finish my meal for me, but lucky for him I was really hungry and didn't have any leftovers for him.

Of course, I can't leave well enough alone and made some changes to this recipe. I only made the changes because I don't have a grill right now - still researching which one I want to buy.  Also, I was originally planning to make homemade Foccacia Bread, but I got busy and ended up buying a Tuscan Garlic Loaf I found at the Publix Bakery - I think it was a fine substitution!

Ingredients

  • 1/4 cup mayonnaise
  • 3 cloves garlic, minced
  • 1 tablespoon lemon juice
  • 1 cup sliced red bell peppers
  • 1 small zucchini, sliced
  • 1 red onion, sliced
  • 1 small yellow squash, sliced
    • 2 tablespoons olive oil
    • pinch of sugar
    • salt and pepper
  • 1/2 loaf of Tuscan Garlic Bread from the Publix Bakery or your favorite bread
  • 1/2 cup crumbled feta cheese

Directions

In a bowl, mix the mayonnaise, minced garlic, and lemon juice. Set aside in the refrigerator. Preheat the oven to 450 degrees (F). Place veges on a foil lined baking sheet. Salt and pepper veges. Pour 2 tablespoons olive oil over veges and add a pinch of sugar. Toss the veges around to coat well with the olive oil and sugar. Roast in the oven for 20-25 minutes until tender and the onions begin to caramelize. Spread some of the mayonnaise mixture on the cut sides of the bread, and sprinkle each one with feta cheese. Place on a foil lined baking sheet and place in oven for about 5 minutes or until bread is warmed and cheese begins to melt. Watch carefully so as not to burn. Remove from oven and layer with the vegetables. Enjoy as open faced sandwiches.


June 28th - July 4th


Thursday - Spaghetti and Meatballs with a garden salad.  Gia Russa Pasta Sauce is on the BOGO Free sale.  This is my favorite jarred sauce. I usually make my own, but when this is on sale I snatch it up because it is on the expensive side typically.  This sauce is lower in carbs than most and has a great flavor - try it and let me know what you think!  Muellers Pasta is also on the BOGO Free sale!  You can also pick up a fresh  baguette for just $1 at the bakery!  They are on sale 10 for $10, but you can buy just one!


Friday - Blackened Tuna Steaks with Mango Salsa and a salad.  I have not tested this recipe, but it has a lot of great reviews. I really want to incorporate more fish in our diet, so I'm going for it. Tuna Steaks are on sale this week at Publix. Hopefully this will be a fish recipe I can eat - I'm not a fan of the fishy stuff. I'll let you know how we like it.  Mangoes are on sale too! NOTE: I usually like to make a recipe exactly as stated the first time, but I fear the heat in this dish might be a little much for me, so I am going to reduce the cayenne by 1/2 and probably the paprika too - then I'll taste it and make any necessary adjustments according to my tastes. Avocados are on sale, so I will add one to the salsa (I LOVE Avocados). I am also going to halve this recipe to serve just 2 people (I don't want leftovers in case we don't like it)


Saturday - Date night! 

SundayLondon Broil with a garden salad.  
London Broil is not a tender cut of meat by any stretch of the imagination, however, if you marinate it overnight and cut it thin enough (I use an electric knife for this), you can have a nice low-carb meal at a great price. It is on sale this week for $3.99/lb, so I'm going to pick some up and marinate it in Italian Dressing (A vinaigrette type dressing - not the creamy kind. I usually buy whatever is on sale - Kraft is on the BOGO Free sale this week).  


Directions
On Saturday (or the day before you plan to make this) score the meat by making diagonal slits about 1/8-1/4 inch deep across the top of the steak (depending on how thick your steak is) - then make a 2nd set of diagonal slits to make crisscross diamond shapes. Turn over and repeat this scoring technique. Place in a large glass container; salt and pepper generously on both sides and pour about 1/2 - 3/4 cup of dressing on the meat. Turn to coat well.  Let marinate in the fridge overnight.


I always like to let meat come to room temp before cooking to ensure it cooks evenly throughout, so I take this out of the fridge  a couple hours before I plan to make it. There are several ways you can prepare this steak, but you should always cook it hot and fast to a maximum of mid-rare for optimum flavor.  First things first - throw out the marinade. I generally like to sear it in a very hot oven-safe pan (coated with a little olive oil). Sear for 1-2 minutes on both sides and then place in a pre-heated 425 degree (F) oven for about 5 minutes - longer for a thicker cut of meat. Remove from pan and let rest for 10 minutes (on a plate or cutting board) and then slice as thinly as possible on the bias (crosswise at a 45 degree angle).  If you don't feel you have a pan large enough  you can also broil it on high, but searing first is great for adding flavor. Broil usually 5-7 mins each side depending on the thickness of the cut.  Remember when broiling to always leave your oven door ajar and turn the exhaust fan on high. No matter how you cook it be sure you have your instant-read thermometer on hand to check the temp. I cook this between 120 and 125 degrees (F) and let rest for 10 mins. I prefer closer to the 120 degree temp. Grilling is an excellent way to cook this as well!  
NOTE: Make up a chimichurri sauce early in the day and it will pair nicely with this! (Be sure to add the ingredients to the shopping list if you plan for this)


MondayBBQ Chicken Sandwiches and Coleslaw.  Love these Sandwiches! I don't like the coleslaw in the recipe. I stick with our fave Sweet Restaurant Slaw!  Sweet Baby Ray's BBQ Sauce is on the BOGO Free sale this week, so pick up 2 of them and keep one in the pantry. We LOVE the sweet and spicy sauce!


Tuesday - This is definitely going to be a leftover night for us so nothing goes to waste. We will have plenty of leftovers in the fridge this week I'm sure.


Fourth of July Wednesday - I haven't discussed holiday plans with Don yet, so I'm not sure what we are doing for the 4th, but with the sales this week I would suggest buying the pork spareribs for 1.99/lb and making slow cooker bbq ribs and coleslaw.  If the weather cooperates and you really want to get outside and bbq, ground chuck is on sale - so burgers are the obvious choice - I would go with the Guacamole Cilantro Lime Burger because they have SO much flavor, and I think I've decided they are my fave! Ball Park Beef Franks are on the BOGO Free sale this week too and hot dog buns are on sale in the bakery!  and Sweet Georgia Corn on the Cob is on sale 12 for $3 (remember you don't have to buy 12 pieces to get the sale price. If you buy just 4 pieces of corn it will be just $1, 8 pieces will be $2, see where I'm going here...)  


NOTE:  If you are using the grocery list on here, be sure to add what you need for your 4th of July celebration.  Don't forget dessert! These cupcakes are da bomb! 


Shopping List


Bakery
Baguette (on sale 10 for $10 - you can just buy 1 for $1)
Buns for the BBQ Chicken Sandwiches. I usually buy the regular hamburger buns (Bonus - they are on sale this week - 8 count package is $2.29)


Produce
Onion x4
Garlic x2
Green onion
Cilantro
Basil
Mango (BOGO Free sale)
Avocados (on sale 2 for $3)
Limes x2 (on sale 5 for $1, but you get the sale price when you buy just 2, so they should be just 20 cents each! yay!)
Small red bell pepper
Jalapeno
1 (160z) bag of coleslaw mix
Extra for me because we love pineapple - Pineapple, peeled and cored (on sale for $2.99)


Spices (most will have these on hand already - so check your spices!)
  • Paprika
  • Cayenne pepper
  • Onion powder
  • Salt
  • Ground black pepper
  • Dried thyme
  • Dried basil
  • Dried oregano
  • Garlic powder
Sugar

Dairy
Milk 
Eggs

Extras
Canola Oil
Olive Oil (I like the Lucini Brand - it's expensive, but worth it!)
1 bottle of your favorite bbq sauce (Sweet Baby Ray's is on the BOGO Free sale this week. I always use the Sweet and Spicy - yummm)
Miracle Whip (you  need at least 2/3 cup)
White vinegar
Italian Dressing (Kraft is on the BOGO Free sale this week)
1 cup dry Italian bread crumbs
Spaghetti Noodles (Muellers is on the BOGO Free sale this week)
Gia Russo Spaghetti sauce (BOGO Free sale) I like the tomato basil the best

Extras I need: 
Bread - Nature's Own ButterBread is on the BOGO Free sale this week. Don prefers the honey wheat, but he's getting the butterbread this week!
Mayonnaise
Jif Peanut Butter (is there any other brand?)
Cokes (On sale buy 2 get 2 free)
Gain liquid laundry detergent is on sale
Crest toothpaste is on sale 10 for $10!
Little swimmies (the dog is getting old and needs diapers - someone suggested trying these on him...I'm game for anything to save my floors from his accidents.  Poor little guy)

Meats
1 Whole cut-up Fryer Chicken
2 lb London broil
2 lbs Ground round
2 Tuna Steaks (1 for each person you are serving)

Wednesday, 27 June 2012

Independence Day Cupcakes


Red, White, and Blue and yummy too!

How perfect are these for your 4th of July Celebration?!!  

Don't think this is just a pretty face either - this cupcake is as delicious as it is pretty. It is filled with vanilla pudding and topped with a homemade whipped topping and fresh fruit  yum yum yum

Just a note about homemade whipped topping - it's awesome! Well worth the little bit of extra effort!

Ingredients

  • 2 1/4 cups all-purpose flour
  • 1 1/2 cups white sugar
  • 1 1/2 teaspoons baking powder
  • 1/2 teaspoon salt
  • 1/2 cup vegetable shortening
  • 3 egg whites
  • 2 teaspoons vanilla extract
  • 1 cup milk
  • 1 (3.4 oz) small package instant vanilla pudding mix
  • 2 cups skim milk
    • Thinly sliced strawberries (smaller strawberries work better for this recipe)
    • Fresh blueberries


  • Directions

  • Preheat oven to 350 degrees F (175 degrees C). Line 24 cupcake cups with paper liners. Whisk together the flour, sugar, baking powder, and salt in a large mixing bowl.

  • With a pastry cutter, chop the shortening into the dry ingredients until the mixture becomes crumbly, then beat in the egg whites, vanilla extract, and 1 cup of milk to make a smooth batter. Spoon batter into the paper-lined cupcake cups, filling them about 2/3 full.

  • Bake in the preheated oven until a toothpick inserted into the center of a cupcake comes out clean, 22 to 26 minutes. Allow cupcakes to cool completely.

  • In a bowl, beat together the pudding mix and 2 cups of skim milk until the pudding is thickened, about 2 minutes. Allow to stand for 5 minutes to finish thickening. Spoon the pudding into a pastry bag with a medium tip.

  • To fill and decorate cupcakes, use a thin paring knife to cut a small hole, about 1/2 inch in diameter, into the top of a cupcake. Insert the knife about 3/4 of the way down into the cupcake, and remove the core. Use the pastry bag to fill the hole with pudding, piping in enough pudding to fill the hole flush with the top of the cupcake. Frost the tops of the filled cupcakes with whipped cream (see recipe below), spreading it into a smooth layer.

  • Place a blueberry in the center of each cupcake. Around the blueberry, arrange 5 slices of strawberry, pointed ends outward, to make a star shape. Store in refrigerator.

  • Whipped Topping
  • Ingredients

    • 1 cup heavy whipping cream
    • 3 tablespoons confectioners sugar
    • 1/2 teaspoon vanilla extract

    Directions

    In a chilled small mixing bowl and with chilled beaters, beat cream until it begins to thicken. Add confectioners' sugar and vanilla; beat until soft peaks form. 

  • Recipe adapted from allrecipes.com Independence Day Cupcakes

Tuesday, 26 June 2012

Grilled Shrimp Tacos


I really liked this recipe. It is easy, quick, and delish! This makes for a great combo after a busy day! Don wasn't gaga over it - he liked it, but he would have preferred to have some rice with it.  Honestly, he could eat rice 24/7! Unlucky for him I am not as big a fan of rice as he is... Don't get me wrong I like rice, but it kinda ruins a recipe I classify as easy and quick. It takes too much time to cook and it means another pan to clean - no thank you! There was no pan to clean with this meal and I wanted to keep it that way!

I pretty much made this recipe as stated except I didn't grill the shrimp for several reasons, but the most important one was TS Debby! The weather has truly been gloomy for DAYS! The wind was whipping so much today - I thought the rockers on the porch were going to take flight!

So how did I make the shrimp you ask??  I broiled them - easy peasy! I lined a baking sheet with foil (double line for an even easier clean-up) and put all the shrimp on there. Then I brushed them with the marinade and broiled them for 3 mins - moved them around a bit and broiled them for 3 mins more.  DONE! and no pan to clean because I just rolled up the foil and tossed it!  My kinda clean-up!  Remember when broiling to leave your oven door ajar or you will burn those little shrimps and that would be sad!


 Note: The Publix where I shop does not carry the Dole Salad Kits, but I did find it at Winn Dixie

Another great shrimp recipe to try is found on my friend's blog - The Life and Loves of Grumpy's Honeybunch: New Orleans BBQ Shrimp


Monday, 25 June 2012

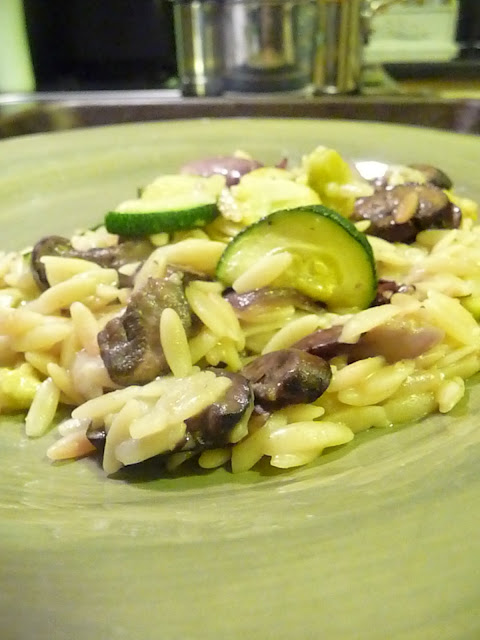
Roasted Vegetable Orzo


With a dish like this there is hope for me being a vegetarian someday!  This was so yummy! I made some changes to the recipe mainly because asparagus was $5.99/lb, and I just could NOT bring myself to pay that. As much as I LOVE asparagus, I really felt this dish would still be great without it...definitely more cost effective for sure!

I served this with Roasted Chicken Breasts and it made for a great pairing! Honestly, I think this would go nicely with just about anything or even on its own!  Here is how I made this dish:

Ingredients

  • 1 zucchini, sliced
  • 1 summer squash, sliced
  • 1 red onion, cut into chunks
  • 1 pound portobello mushrooms, sliced
  • 4 cloves garlic, minced
  • 2 tablespoons olive oil
  • 1 pinch white sugar
  • salt and black pepper to taste
  • 1 teaspoon chicken base
  • 1/2 cup Sake or dry white wine
  • 1 1/4 cups water
  • 8 ounces orzo pasta
  • 2 tablespoons butter
  • 2 tablespoons grated Parmesan cheese

Directions

Preheat oven to 450 degrees

Place the zucchini, squash, onion, and mushrooms on a foil lined baking sheet; add in garlic, olive oil and sugar, and stir gently to coat vegetables. Sprinkle with salt and pepper.

Roast vegetables until tender, 20 to 25 minutes  


Meanwhile, melt butter in heavy skillet over medium-high heat. Stir in orzo and saute until lightly browned.

Mix the water, chicken base, and wine and slowly add to the orzo; bring to boil. Cover. Reduce heat and simmer until orzo is tender and liquid is absorbed, about 15 - 20 minutes.

Mix in roasted vegetables and Parmesan cheese. Season with salt and pepper to taste and serve warm. 

Be sure you taste this before adding salt. The Parmesan cheese will add salt and the veges have already been salted, so give it a taste to make sure you need to add more.

I really liked the Sake added to this dish - it really gave it a nice flavor, however, you can change up the liquid to suit your tastes. As long as you add 1 3/4 cups liquid in the end it can be the liquid of your choosing.  If you don't think the wine is going to be to your liking try reducing it to 1/4 cup and add 1 1/2 cups water (with the chicken base). If you prefer to use chicken stock instead of water and base - that is fine too. You can even try a vegetable base with water or vegetable stock.  Make it your own and enjoy! 


Saturday, 23 June 2012

Neapolitan Cupcakes


Neapolitan Cupcakes | by Life Tastes Good #Summer #Dessert


As an Allrecipes.com Allstar I have some activities to work through each month to fulfill my commitment. One of the activities this month was to make, review, and photograph something that tastes like summer. I chose these Neapolitan Cupcakes because ice cream is a real summer treat and these just sounded really good.  Also, this particular recipe needed a photograph so I thought it was a good choice!

It was a good choice alright! These were easy to make, and Don said they really do taste like Neapolitan Ice Cream! I didn't believe him - I thought he was just trying to be the sweet hubs he is. So I had to try one for myself. I ended up trying to be good and only ate 1/2 of one and you know what?  He wasn't just being sweet (I should have known better haha)!  They really DO taste like Neapolitan Ice Cream!  Very cool!


They turned out so pretty too!
  

...off to eat that other half!!

Neapolitan Cupcakes

Life Tastes Good
Published 06/23/2012
Neapolitan Cupcakes

Ingredients

  • 1 (19.8 ounce) package brownie mix
  • 1/2 cup vegetable oil
  • 2 eggs
  • 1/4 cup water
  • 1 (18.25 ounce) package strawberry cake mix
  • 1 cup water
  • 3 eggs
  • 1/3 cup vegetable oil
  • 3/4 cup unsalted butter, softened
  • 8 ounces confectioner's sugar
  • 1/2 teaspoon vanilla

Instructions

  1. Preheat oven to 325 degrees F and line a muffin tin with cupcake liners (about 24).
  2. Combine brownie mix with 1/2 cup vegetable oil, 2 eggs, and 1/4 cup water. Mix until combined. Set aside.
  3. In a separate bowl, combine strawberry cake mix with 1 cup water, 3 eggs, and 1/3 cup vegetable oil. Beat on low for about 30 seconds and then on medium for about 2 minutes.
  4. Fill 1/3 of each of the cupcake liners with brownie mix. Top the brownie mix with strawberry cake mix so the cupcake liners are 2/3 full. You will have cake mix leftover. I like to freeze it to make another batch later. It freezes well.
  5. Bake in the preheated oven for about 18-20 minutes or until the cupcake tops spring back when lightly pressed.
  6. Cool in pan on a wire rack for 10 minutes and then remove from pan and cool completely on wire rack.
  7. Beat 3/4 cup softened butter until creamy. Add 1 cup confectioner's sugar and beat until combined. Turn mixer speed to high and beat until fluffy. Keep adding confectioner's sugar until desired taste and consistency is achieved. Add 1/2 teaspoon vanilla and beat until combined.
  8. Pipe icing onto cooled cupcakes and enjoy!
Yield: about 24 cupcakes
Prep Time: 20 mins.
Cook time: 18 mins.
Total time: 38 mins.
Tags: cupcakes, dessert, snack, party, summer, strawberry, brownies

recipe inspired by Allrecipes Neapolitan Cupcakes

Spinach Artichoke Cheese Fondue


The girls in this house LOVE the Spinach Artichoke Cheese Fondue from the Melting Pot.  A night out can be a bit of a splurge, so we decided to try it at home.

Grandma gave Madison a portable Induction Cook-top for use at college, and we decided to make sure it works before she hauls it all the way to Savannah (we just really wanted to have some fondue, but making sure it works sounded like a good excuse).  Seeing as my stove has an induction cook-top we are very familiar with the technology and thought it would be perfect for a fondue night. Because it's portable, we could do the cooking right at the table just like being at the Melting Pot!


Here is the recipe that inspired us and the following is how we ended up making it...

Ingredients
1/2 cup vegetable broth
1/2 to 1 cup fresh baby spinach, chopped
1/4 cup artichoke hearts, chopped (we bought the ones in the jar, because getting to the heart of an artichoke is quite a task)
1 tablespoon chopped garlic (it was more like 1.5 tablespoons, but it was a bit too much - even for me)
4 oz Butterkase Cheese (Publix did not have this, so I found it at Petty's, and yes, it was worth it)
4 oz Fontina Cheese
1/4 cup grated Paremsan
flour

Dippers
Tortilla Chips
Various breads cut into bite sized cubes
Apples cut into bite sized cubes (coat with a little lemon juice so the don't turn brown)
Various veges cut into bite sized pieces

Directions
We used one of my regular sauce pans because we needed a magnetic bottomed pan to work on the induction top (love that technology!).  We heated the vege broth in the sauce pan and mixed in the spinach, artichoke hearts, and the garlic.  Turn down the heat before adding in the cheeese


I grated the Butterkase and the Fontina and lightly floured it.  I added it to the vege broth mixture a little bit at a time. Being sure to melt it as I go.  

Tips for working with cheese:  It is important to treat the cheese kindly during cooking.  Too high a temperature or too much heating time can make the proteins tighten up resulting in rubbery globs of cheese in a pool of grease - yuck!  If this happens you can't fix it and your fondue is ruined.  To lessen the chance your cheese will succumb to this sad fate be sure to grate your cheese to increase the surface area that is in contact with the heat source - this will ensure a quicker melting time. Always be sure your cheese is at room temperature before you heat it - again this will reduce the time and heat needed to melt it.  Melt cheese at a lower heat to prevent it seizing up.  Bottom line - Be kind to your cheese and your cheese will be kind to you


With induction technology you really can use a paper towel between the pot and the heat source! Don't try this at home with an electric or gas stove though!


 We had trouble getting the cheese and the vege broth to combine to a good consistency, so I added a tablespoon of flour and mixed it all really well. That worked great.  If I were to make this again, I would probably add in a tablespoon of flour with the vege broth at the beginning to thicken it - I think that might work better, but I haven't tried it. 

This was a fun family night! 
The fondue was really delish (although a bit too garlicky - even for me!)


Friday, 22 June 2012

Madison's Angel Food Cake French Toast


Perfection on a plate!

You. Will. LOVE! This!

...nothing left to say


Ingredients
Angel Food Cake Box Mix (just add water!)
4 eggs
1 cup whole milk
2 tablespoons brown sugar
1 teaspoon cinnamon
1 teaspoon vanilla
pinch salt
butter

Directions
Make the cake the day before you plan on making the french toast. Follow the directions on the box.  Madison likes to make this in a 13"x9"x2" cake pan (a smaller pan will overflow).  If you prefer to save time, I'm sure this will be just as good if you purchase the angel food cake from the bakery.

In the morning, whisk together eggs, milk, brown sugar, cinnamon, vanilla, and salt. Slice the cake into desired sizes and dip each slice into the egg mixture to coat - do this about 3-4 pieces at a time (whatever will fit in your skillet). Heat a large skillet to medium heat. Melt enough butter to coat pan. Add cake slices and cook for about 2-3 minutes on each side. The french toast should be golden brown. Continue until you've cooked all the cake pieces. Add butter to the pan as needed. Serve with fresh fruit and pure maple syrup.